Thursday, October 13, 2011

Peanut butter cups - Metric recipe!

There are many things Americans do that I do not understand. Like how they use decimal currency but refuse to adopt the metric system. And how they insist on giving new names to things that have perfectly good names already, like "baking soda". What's wrong with calling it bicarb? And combining maple syrup with bacon, that one is just too weird for me.
Another one I never really got was why they try to put peanut butter in so many of their desserts. I like peanut butter on a sandwich, but in a cheesecake? It just seems wrong! But recently a customer at work gave me a Reese's Peanut Butter Cup, and I have to admit it was rather yummy! And I remembered seeing on Pinterest that some people make home made ones, so I gave it a go.
I have to say, these were damn yummy! A little bit salty, and not too sweet, I'm quite pleased with my home made peanut butter cups. Though I only ever had that one little morsel of Reese's so it's hard to compare, but mine were pretty good. My friends loved them too.
But of course being such an American thing all the recipes I found online are in imperial measurements. So I had to make it up a little bit as I went along. Below is my recipe, but be warned, this made far too much peanut butter filling. I had to throw out a fair bit. The amount of peanut butter fillingg coule easily make another dozen cups, so you'd have to increase the amount of chocolate used. But I think next time I'll just reduce the amount of peanut butter filling.
Metric peanut butter cups
Makes 25
600g chocolate (I used a half/haf mixture of dark and milk)
1 cup peanut butter
1/2 icing sugar, sifted
1/2 teapsoon vanilla essence
Melt 300g off the chocolate. Let it cool down so that it is still liquidy but won't burn your hand, and spoon it into 25 mini paper muffin cases. As you spoon chocolate into each case push it against the sides to form a cup. Put in the fridge until set.
In a bowl combine the peanut butter with the icing sugar and stir until well combined. Add the vanilla essence and stir until mixed in thoroughly. Spoon into each chocolate cup, leaving enough room for the chocolate topping. Using your finger push the peanut butter filling down until it's fairly flat in the cup. Refrigerate until set.
Melt the other 300g of chocolate, and spoon on to the top of each cup trying to make the tops fairly level. Refrigerate until set.

Sunday, September 11, 2011

Soup-er winter!

I have been a naughty, naughter little blogger.. I haven't posted anything all winter!

I have been cooking plenty though. And this winter I rediscovered soup.

Sounds like a no brainer I know, but surprisingly I've not made a lot of soups before. But over winter I was craving hot lunches, and knowing chips and burgers were a bad idea it occured to me that depending on the soup and how it's made it can be a very low-calorie, vegie-filled meal. So I got to work experimenting with different soups. Here are the five I made this winter.

Pumpkin Soup

Again this seems like a no brainer - but I've only ever eating pumpkin soup my mum made. I used this recipe as a starting point, but made mine a little differently. I used nearly 2kgs of butternut pumpkin, two potatos, added two carrots, and left out the leek and the cream. Because I prefer to stir in sour cream at the end.

Results were oh so yummy. I've made this three more times since!

Pea And Ham Soup

Having had success with the pumpkin soup I decided to give another classic a try. Again I started with a recipe but did it a little differently. I used only one onion, and after sauteeing it in a frypan I put all the ingredients in my slow cooker for the day.

Results - not impressed. I'm told by others that tried it that it was lovely, so apparently I'm just not a fan of pea and ham soup.

Harira

I had friends coming over for dinner, and Little Princess had been playing with my cookbooks again, so my Morroccan cookbook (which these friends had given me for my birthday) was lying on the floor. I decided it was fate and had a flick through for something to cook. This lamb and chickpea soup caught my eye. This time I followed the instructions exactly.

Results were fantastic! This was a really thick, chunky soup, almost more like a stew. The lamb was so tender, the chickpeas were cooked through, and there was so much flavour. Totally worth the $15 the lamb cost me.

Carrot and ginger soup

I tried this twice, both using the same recipe. First time I left out the water, only using 1 litre of chicken stock, It was lovely and thick, but I didn't get much soup, I filled two bowls and had almost none left. The next time I put in the water, but ended up with a much more liquidy soup which didn't fill my tummy at all.

Overall very pleased with the taste. But definitely not a meal to eat after a hard workout at the gym. If left me quite hungry.

Sweet potato and chicken soup

Once again the recipe came from Taste. This was an attempt to make hubby and I feel better while suffering from a terrible flu. I used a brown onion instead of a spanish one, which I sauteed before adding the other ingredients. And the soy milk was swapped for sour cream.

Unfortunately I have no idea how it tasted. Once done cooking I discovered I had no sense of taste because of the flu. It had a nice texture, but that's all I can really say about it.

Sunday, May 22, 2011

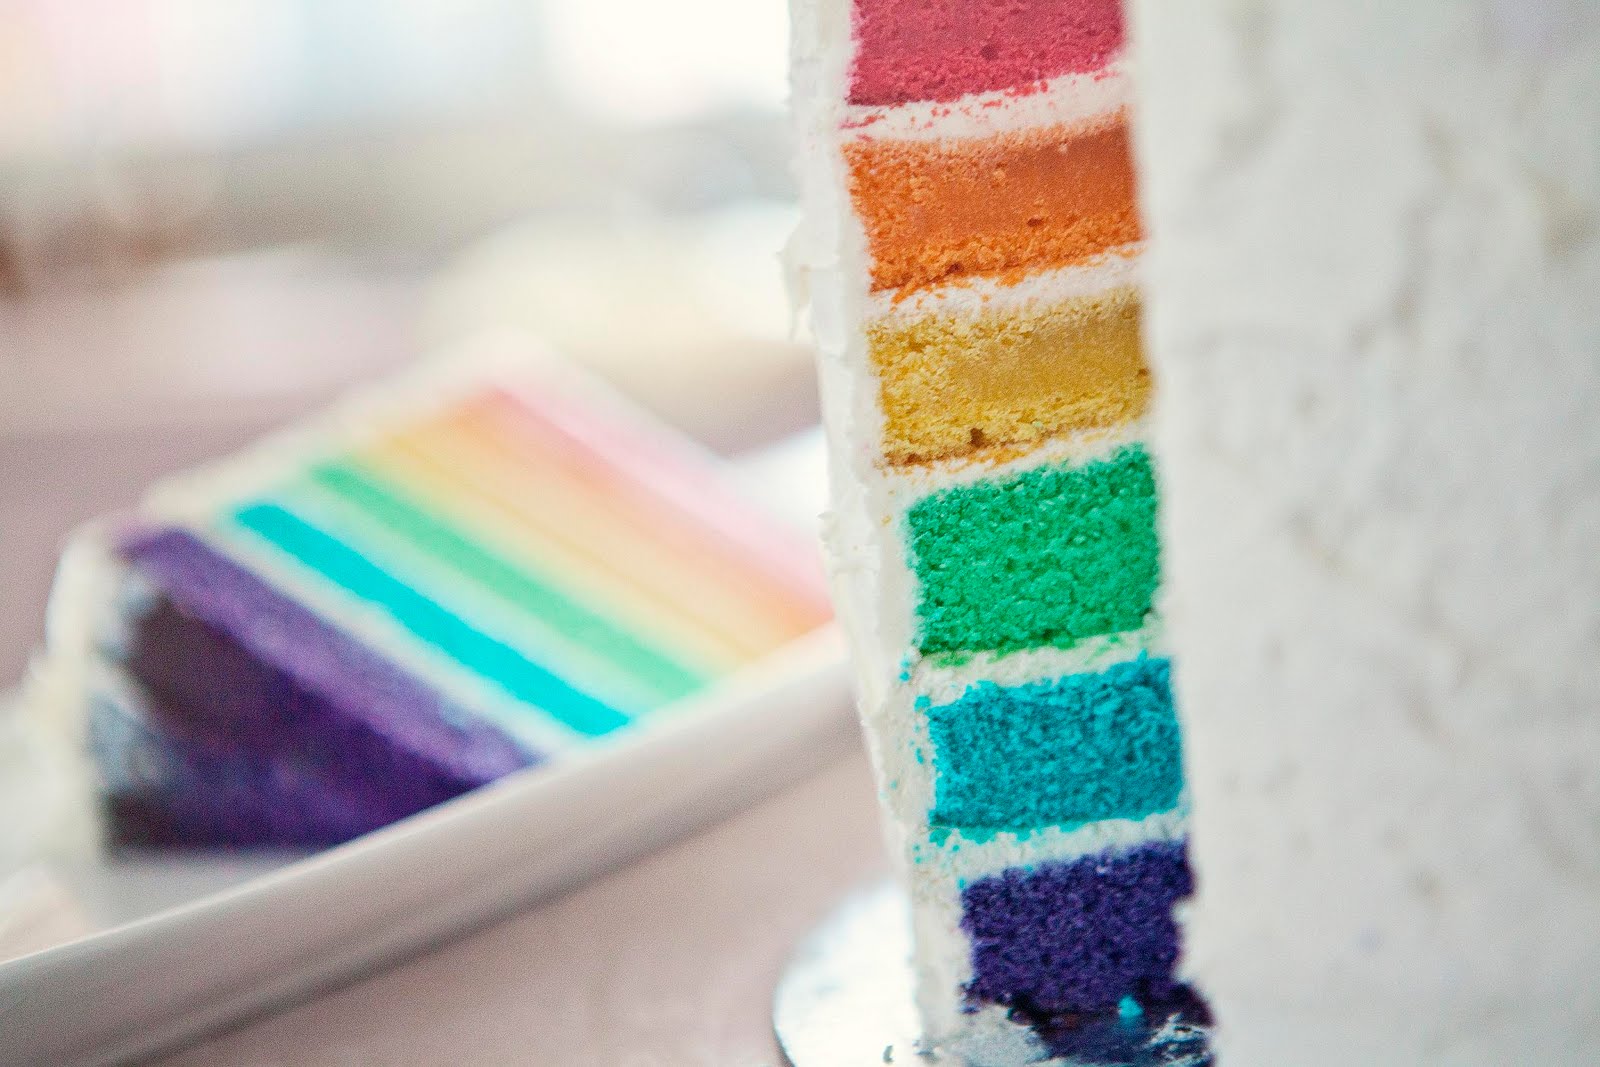
Rainbow cake - tutorial


An old friend from uni has been studying photography, and offered to come by and do a cake smash shoot with my Little Princess. So I decided it would be fun to make a rainbow layer cake I had seen on the Whisk Kid blog.


It didn't smash very well. She gave the big cake a good hard whack, but it did nothing and she lost interest, so instead we gave her just a slice to play with. We had more success and got some beautiful photos, but this left me with a very big cake to use up somehow, so I took it to work and left it in the staff room with a note telling my collegues to have at it.


The rainbow cake had a fantastic reaction, and as a result I found myself making another one for a work collegues birthday, so I took photos as I went to create my very own tutorial.

The first step is to make a cake batter. Any white cake will do, I used Donna Hay's Melt N Mix buttercake. I find this recipe makes 6 cups of batter, making it perfect for a rainbow cake because you can easily divide it into three portions to colour. So first I did red, yellow and orange, and baked each one for 20 minutes in a 20cm tin. Then I repeated the process, this time with blue, green and purple.


Once baked and cooled I like to wrap each cake individually in glad wrap and let it rest, overnight if possible, then I level them, cut off the crusts using a template to make sure all cakes are the same, and get to work layering them.


I made 1 1/2 times more normal buttercream recipe and coloured it white, and put 1/2 a cup between each layer. Measuring it makes sure the layers are even. I like to use purple at the bottom, but that's purely personal preference.


Finally do a quick crumb coat. This is just a really thin layer of buttercream spread over the sides of the cake. As you can see in the picture you will see the layers through the buttercream, and there will be crumbs visible in the buttercream. That's ok. Next step is to let it set in the fridge for at least a half hour so the buttercream crusts up, and then spread it nice and thick with a good layer of buttercream. The first crumb coat will hold all those nasty loose crumbs in place.


Personally I like to then leave the cake just white. It's like a disguise for the beautiful chaos that goes on underneath. But this cake wasn't for me, and I was asked to decorate it with something girly, so I played with my new butterfly and gerbera cutters. I wanted to get some ladybugs on there too, but got dreadfully sick so I couldn't make them.


So there you have it, instructions on how to make your very own rainbow layer cake.

Chocolate chip pikelets

I have no idea at all why it popped into my head, but recently I remembered one time when I was eight, and my parents went to a wedding so my Grandma came to stay the night with my brother and I. I remember two things about that visit - one is the skivvy my Grandma wore that read "Recycled Teenager" (she was a cheeky lady) and the other is the chocolate chip pikelets she made us for dessert. Which she made in the jaffle iron.


Why they were made in the jaffle iron remains a long lost mystery. As does, sadly, the recipe. My Grandma died when I was 14, and before she did I never thought to ask these questions.

But since starting this blog I've found myself getting more and more daring with food, and finally decided chocolate chip pikelets could, quite possibly, just be a process of adding chocolate chips to pikelet batter. So I made some pikelet batter I learned from my mum, who learned it from her dad (Poppy), and tossed in a fistful of dark chocolate chips. Interestingly Grandma wasn't mum's mum, she was dad's mum, so both sets of grandparents had a hand in this dish.


This is Poppy's recipe for pikelets:


1 cup self raising flour

1 teaspoon bicarb

3 tablespoons sugar

pinch of salt

1 egg

2/3 cup milk
2 tablespoons butter


Stir the dry ingredients together, then whisk in the egg and milk. Melt the butter in a frying pan, and pour into the batter, whisking to incorporate it. Cook dessert-spoonfuls of batter in the frying pan until bubbles form, then turn and continue cooking until cooked through.


And as I said, I added a heap of chocolate chips.

Results - As you can see from the picture, the pikelets were not very pretty. Also I understand now why cooking them in the jaffle iron was a good idea. It cooked both sides at once. The chocolate chunks melting made it very hard to flip these pikelets. But OMG, so yummy! This is comfort food at it's best. Simple, warm, chocolately.

Sunday, May 8, 2011

Mothers Day

Yesterday was mothers day, so I treated my mum to a three-course dinner. Cooking for mum does have one tiny challenge though - she's a vegetarian. I've put all three dishes into one blog post, because I'm lazy that way.

Entree - Caulflower soup with onion and buttermilk bread

First of all the bread, it was really simple to make, just self-raising flower, chives, buttermilk, and a packet of french onion soup. I used my kitchen mixer to make the dough. But the dough was really sticky, and the resulting bread was very doughy. I didn't love it.

The soup was from Donna Hay's Seasons. It was supposed to have porcini oil drizzled over the top, but I had no luck finding porcini mushrooms. I made it ahead of time, adding the cream and reheating just before serving. I also swapped the chicken stock for vegetable stock, to keep it vegetarian. It was a nice soup, with a very subtle flavour. But it made the house STINK of cauliflower.

Main - spinach ravioli with basil oil

Another recipe from Donna Hay's Seasons, this one involved making the ravioli myself from ricotta, spinach, lemon zest, parmesan, basil and gow gee wrappers. The oil was just basil and lemon juice mixed into olive oil. Then the whole lot was sprinkled with some sliced bocconcini. It had a lovely flavour, but was a bit of a gow gee overload. It wayed my stomach down a bit, so I could only eat about two-thirds of it.

Dessert - Stewed apple and bluberries with coconut cobbler

Again from Donna Hay's Seasons (all these recipes were from the Autumn section). The filling was made up of red apples, blueberries (I used canned), lemon juice, sugar and a vanilla bean. It made my house smell like a candle shop while I was cooking the filling. The cobbler had flour, coconut, vanilla, oats and milk. I loved the fruit filling, the cobbler not as much. It didn't cook properly so it was doughy in the middle, and I think it would have been better without the vanilla. Still this was my favourite of the three dishes.

The most important thing of course was that mum loved her dinner :)

Tuesday, April 12, 2011

Salted caramel fudge

This week we sadly lost a dear family member, and although I wasn't as deeply affected as some others in my family, I was rather sad and I did find myself in search of a bit of comfort food. And for some reason fudge came to mind.


I went in search of a recipe for Irish Cream fudge I had made a few times before and really liked. But while searching I happened upon this recipe for salted caramel fudge. I remembered hearing that salt and sweet work really well together, so I decided to give it a try.


However sea salt flakes cost $8 a pack, and since I have no other real use for sea salt flakes I decided instead to use a teaspoon of ground sea salt, which I stirred into the fudge rather than sprinkling on the top.


This was super yummy. With the condensed milk, the brown sugar, the glucose syrup, the golden syrup and the white chocolate you expect it to be really sickly sweet, but that kick of salt really does take the edge off the sweetness so you're left with a lovely caramel flavour. Though it's not something you can eat a whole lot of, it is very rich, and the saltyness did leave me reaching for a big glass of water. But it certainly is very good comfort food, so just what I needed this week.

Chocolate eclairs

I've always shyed away from trying choux pastry, because of vague memory of someone (no idea who) telling me it was really hard to get right.


Then a few weeks ago on My Kitchen Rules I saw two cops from Tasmania not only nail it, but do it en masse, at short notice, for hundreds of kids and parents. Not only that, they did well enough to earn kudos from a world class French chef. So I thought if they can pull that off, how hard can choux pastry really be?


As it turns out it's not hard at all, as long as you know exactly what you're doing.


The recipe I used came from a copy of French Cooking Made Easy that my mum bought me way back in 1997 when I first started studying French in school. It was my bible for many a French cooking project at school, and I still crack it out from time to time. The photography is a bit daggy, but the food I've made from this book always tastes great. I read the recipe over and over and over again, then read it once more to make sure I totally understood the process I was undertaking, then dove right in.


The pastry took me only ten minutes to make. The hardest part I found was stirring the flour into the boiled water and butter mixture, you have to stir really quickly to get a smooth consistency, and it goes into a stiff ball quite quickly, so stirring it took all my upper arm strength. Luckily after that the electric mixer does all the work as you add the eggs.


I'm proud to say I nailed my chocolate eclairs. The pastry turned out so nice and crispy, and using cream I'd whipped myself they tasted so much better than eclairs you buy in the shop. Ironcally the bit I got wrong was not the choux pastry I'd always believed was so hard to make, but the chocolate I put on the top. Chocolate being an ingredient I have much experience with. It seized, and became hard to spread.

Monday, March 21, 2011

Pork and plum steamed dumplings

I am seriously, hopelessly addicted to My Kitchen Rules. I have no idea why, because normally I hate reality TV, but something about this show really speaks to me. Maybe it's because these are amateur cooks like me, maybe it's Manu's accent, I can't be sure.

At any rate it's been inspiring me to try some things I've never tried before. On one episode one couple were making Shu Mai, and the next day while at the gym I saw Kerri-Anne making similar dumpling type things, and I thought I'd give it a go.


I used this recipe from Taste, but replaced the garlic cloves with 2 teaspoons of minced garlic, and 1 teaspoon of minced ginger (because Chinese foods NEEDS ginger). I also folded them into more of a gow gee shape, lik Kerri-Anne had done. And I don't have one of those bamboo steam basket things, so mine got cooked in an electric steamer my mum bought me some months ago. In the electric steamer they took 14 minutes.


OMG - these were fantastic! Some stuck together in the steamer, but I think I crammed too many in there so I'll know for next time. But there will definitely be a next time because I enjoyed them so much. Hubby didn't love the water chest nuts though, he mistook them for uncooked onion. But these were quick, healthy, and surprisingly easy. Not to mention cheap - buying the mince marked down I spent less than $10. So this one is a winner.

Friday, March 18, 2011

Cupcake adventures

I have been a naughty little blogger... last update was in August! Rest assured though I've been cooking up a storm. Among other things I've been building up a repertoire of cakes and cupcakes for my cake venture, and I've sold a couple of cakes to friends! But don't tell the tax office.

These lovely creations were actually all made in January. After the Queensland Floods some of the shopkeepers of Leura decided to hold a cake stall to raise money, and I made this to donate. And photograph.

The animal prints were a design from the Planet Cake Cupcakes book, as were my Comic Book Cliches. The latter were actually an altered version from the book, they started with speech bubbles but i added the comic book twist because I wanted a boy design.


The roses were made in a mould I already had, I was going for a shabby chic vintage cupcake with those. And the two tone buttercream (which was actually the easiest of the designs) was a technique I'd been wanting to try out for a while.


Overall I must say very pleased, though my piping clearly needs work. Those letters in the speech bubbles are really wonky! I just hope they raised some money for my Queensland bretheren.


Tuesday, August 10, 2010

First birthday cupcakes

One of the babies at play group turned one this week, so naturally he needed a cake. I still had plenty of purple and green fondant left over from hubby's welcome home cake, and I wanted to trial run an idea for another birthday I am doing cupcakes for this month, so that's how these lovely cakes were created.

I kneaded some CMC into the fondant before cutting out the shapes, to help them dry out quicker. I did the cutouts and let them dry overnight, then glued them together with sugar flower glue and let that dry overnight before putting them on the cupcakes.
The cakes themselves were the recipe from the Planet Cake book. Normally I would use the Crabapple recipe, but it makes 24 cakes and I didn't want to make that many. The Planet Cake recipe made 12, which was a much more managable number. However, I didn't have any lemons so I had to leave out the lemon zest. The frosting is the Crabapple Cupcake Bakery's vanilla buttercream, but I made a half quantity (and still had heaps left).
I love this cupcake recipe. It's really easy, and the cakes had a lovely dome on top, which made the soft-serve frosting effect really easy to achieve. They tasted pretty good too, as did the frosting. And I loved how the number stars turned out - they reminded me of Toy Story. Though I'm seriously considering switching to vanilla extract instead of vanilla essence - I found these tasted a tad chemical. I'm also thinking of trying an Italian meringue buttercream in future, because the frosting is rather gritty.

Welcome home cake


Hubby went on an overseas business trip recently, and I wanted to give him a special surprise when he got home. So I took a whack at the Exploding Stars cake from the Planet Cake book.
The cake itself is chocolate mud, from the Planet Cake recipe. This cake was surprisingly easy to make, but next time I plan to leave out the coffee. I found the coffee flavour too strong.
Under the fondant is a layer of ganache, which is supposed to help the cake keep its form under the layer of thick fondant. Honestly, I think I may have used too much. Once the fondant went on the surface of the cake became like play dough, the slightest touch left a dent, so I couldn't get the sharp edges that Planet Cake is so famous for, and on the whole my cake looks a but smushed.
Also, hubby returned home a day early to surprise me! This meant I never got time to fully complete the decorations. That said, the cake he was surprised with still looks pretty good, and I'm quite proud of it :)

Wednesday, August 4, 2010

Fun times with baby food

I have a confession to make. Annabel Karmel is my hero!

Little Princess is now ten months, so has been on solids for some time now, and it's been quite adventure. Early on I was petrified of starting her on solids, jusst because I had no idea what I was doing. So I bought a book recommended by a friend called What Do I Feed My Baby? By Leeane Cooper. Full credit to this book, it gave me a lot of confidence with solids. It gave me a rough schedule of what to feed her and when, which I didn't follow perfectly, but it really did help. The only problem was it told me what to feed her, but not how to cook it. I had never stewed an apple before in my life, so I was still a bit lost.

And to be honest, I don't think I was doing too well at it, because very soon Little Princess was refusing anything I cooked, and only eating purees from a jar. She never knew it was from a jar because whatever I fed her was always in a bowl, she just preferred the jar foods. By the time she was 7 months she progressed to jars of things like spaghetti bolognese and shepherds pie, and I started to wonder if Heinz had a recipe to make such things, surely there were recipes out there I could use too? So I marched into Dymocks, and a very kind shopkeeper went through all the baby food books with me until we found one that suited my needs. It ended up being The Complete Baby And Toddler Meal Planner by Annabel Karmel.

This book has been brilliant. It took all the guess work out of making baby food, and meant I could try her on things like fish and beef, which I hadn't been brave enough to try before because I didn't know how to cook it for a baby. At ten months Little Princess has now hit a fussy stage, but I'm proud to say it's now the jars she turns her nose up at. My cooking she eats by the bucketload.

Here are some of the dishes she has liked best:


  • Cheese and vegetable pasta
  • My first bolognese
  • Tomatos and carrots with basil
  • Sweet potato with spinach and peas
  • Cauliflower cheese
  • Tasty fish with cheese sauce and vegetables
  • Fish with spinach and cheese
  • Chicken in tomato sauce
  • Fruity Chicken with apricots*
  • Apricot, apple and pear puree
  • Apple, strawberry and blueberru puree
  • Apples and blackberries
  • Tasty brown rice
  • Zuchini and tomato pasta stars'

She wasn't so keen on Lovely Lentils or Fish with Sweet Potato. Soon I'll be making the tasty rice with meat and vegetables, and the chicken and apple balls. I love this book, and any of my friends that have babies in the future will be recieving a copy at their baby shower.

* The Fruity Chicken with Apricots, when made to the exact directions in the book, I found to be far too wet and saucy. It was almost a soup. So I twaeked it a bit, and now we have a dish that Little Princess just loves. It also freezes really well in ice cube trays :) Here is my tweaked recipe:

  • 3 tsp light olive oil
  • 1/2 smaall onion, finely chopped
  • 1 tsp minced garlic
  • 250 g chicken breast mince
  • 9 dried apricots, chopped
  • 300 ml Passata
  • 150 ml Campbells Real Stock reduced salt chicken stock
  • 1/2 cup brown rice, washed then cooked until soft

Heat the oil in a saucepan, saute the onion and garlic until soft. Add the chicken mince and cook, stirring, until cooked. Add the apricots, stock and water, bring to the boil then simmer, covered, for about 10 minutes. Add the cooked rice and stir through.

Sunday, June 6, 2010

Red velvet cupcakes with pink jasmine decoration


We used to have a lovely lady at work who made cupcakes for our social get-togethers, but as she moved to Perth a few months ago someone had to pick up where she left off. And a recent farewell for yet another work collegue was a great opportunity for me to have some fun with making pretty cupcakes.


I used the red velvet cupcake recipe from issue 41 of Donna Hay (Oct/Nov 2008). I've used it before and it always impresses. The colour comes from red food colouring, but the delicate flavour comes from only 1/4 cup of cocoa. The small amount of cocoa gives it more of a subtle spiced flavour, rather than a chocolate flavour, which goes beautifully with the cream cheese frosting. I do usually find though I have to add a bit more icing sugar than Donna uses in the frosting. Like three times as much, otherwise the frosting won't hold its shape on the cupcake.
I piped on the frosting with a star tip in a piping bag. The last time I used this piping tip was three Christmases ago using white chocolate ganache, and the results were so disasterous i ended up smoothing the icing over with a knife so noone would see how much I sucked at piping. This time though, I seem to have gotten it right. My piped frosting looked really cute, but still showed off the red colour of the cake, and made a great backdrop for my pink flowers.
The pink flowers I made myself using fondant I had coloured pink, and a small jasmine flower cutter. I placed the flowers onto sponges I had dusted with icing sugar, used a ball tool to press them into shape, then left them to dry for a few hours before piping the centres with glace icing. For the record, I should have used royal icing because it would have lookd better and been easier to pipe, but I don't have any mix and I didn't want to fuss about with beating egg whites and whatnot for the sake of some tiny white dots. I attached the flowers to the cakes by simply pressing them gently onto the cream cheese frosting while it was freshly piped, and therefore still very moist and clingy.
Thoughts - OMG I have to make red velvet cupcakes more often! They really do have the most divine flavour, my co-workers were all very impressed. And I must say I'm very proud of my piping efforts, they really have improved dramatically. That said, my flowers still need work. I don;t expect to get good at them overnight, I will need more practice. I've already gotten some tips from some fellow decorators at the Planet Cake forum, and from a friend who is a pastry chef, so I'll get there :)

Chocolate Caramel Slice - second attempt

I decided to have another go at chocolate caramel slice, this time though I worked off a recipe by the ever-inspiring Donna Hay.

It called for a thinner base, twice as much condensed milk in the filling, and vegetable oil in the chocolate layer, rather than copha. All of this appealed to me. The caramel is after all the best part of a caramel slice so I liked the idea of having more of it. And the vegetable oil seems easier to work than copha... it always seemed a waste to buy a whole block then only use 50g, because once the bblock is opened it just dries out and gets ruined and winds up in the bin. But vegetable oil I can use one teaspoon and put the rest in the cupboard to use later.

Unfortunately I forgot a few of the basics I learnt in science class. A lack of space in my main fridge meant I had to cool the slice in the drinks fridge, and I placed it on a glass shelf not realising that the hot slice would cause the cold glass to crack. My clumsiness knows no limits....

Thoughts - we ate the first pieces before the chocolate had fully set, and before the caramel had completely cooled, and we weren't impressed. By the next day however, all the ingredients had time to settle in and it tasted so much better. I was really impressed, except that I felt the base was too buttery and as a result too greasy.

Saturday, May 29, 2010

Victoria Sandwich

I was asked by my lovely husband to make a cake. A special cake, just for him. Specifically, a cake filled with cream. I do love cakes with cream in the middle so I agreed.

And the timing couldn't have been more perfect, as he asked just a few days before my copy of the Women's Weekly Sweet Old Fashioned Favourites arrived at my work book club. I had a quick flick through, and decided a Victoria Sandwich would do the trick nicely.

In all honesty, the recipe didn't actually have cream in the middle, only jam. But I figured since the jam was there already, cream would be fine.

Thoughts - not great. Not bad, but not great. Hubby was dissapointed first off because although it had cream like he has asked, it had no frosting on top. He also said it was like eating a slice of a very big scone. And he wasn't far wrong. The buttercake was a tad dry, and with the jam and cream it really was just like a big scone, but with one difference - vanilla extract. And you could really taste the vanilla extract. Usually vanilla is meant to be a subtle flavour, but in this cake it was a bit strong and as a result tasted a bit chemical, despite the fact I use a natural extract.

If I'm ever invited to a high tea I might consider making it again... maybe. But it feels more likely I'd try something different, in the hope I wouldn't be quite so dissapointed.

Wednesday, May 19, 2010

Funky flower cake


I haven't done much in my kitchen lately that qualifies as something new, so I haven't had much to blog about. But I've been watching a great show on Foxtel called Ace Of Cakes, and some videos on Youtube, and I'm feeling all inspired and want to practice my cake decorating skills. The hope is that I'll be able to develop my own little portfolio and start my own little cash in hand cake business.

The cake itself was an old favourite, the Chocolate Birthday Cake from the Crabapple Cupcake Bakery Cookbook. Since I was basically creating a prototype it made sense to use a recipe I was familiar with, because I could just slap it together quickly and focus on the decorating part.

I created the fondant flowers first. I made them a day ahead, using a cookie cutter I had on hand. The centres were just balls of fondant I flattened with my fingers. On the very last flower I decided to experiment, so I made a very thin sausage of fondant and would it into a spiral, which I used as the flower centre. I liked the look of the swirl much better, but by then the flowers were all glued together. So I'll use the swirl in future.

I used a crumb coating of chocolate buttercream, then a layer of rolled white fondant. Then in the morning I glued on the flowers.

Thoughts - I find people often complain there is too much icing on a cake, so I tried to roll out the icing incredibly thin so this wouldn't be a problem. It turns out there is a reason there is usually too much icing. The thin icing didn't completely cover the various lumps and bumps on the cake, so it looked a little rough. Also I found that the flowers turned out more cartoony than I was hoping. I was trying to achieve a wedding cake look, but instead wound up with something more suited to a birthday party. But then, that's the whole point of making prototypes, right? Overall I'm pleased though. I've learnt a few new tricks, and I've improved a bit since my handbag cake, and at this stage that's the most important thing, that my skills progress.

Sunday, March 7, 2010

Chocolate Caramel Slice

The other day council decided to paint my street. And I don't mean they painted lines, or resurfaced. They literally painted the whole road a blacker shade of black. Questionable use of ratepayers money aside, this also meant my street was closed off for about five hours, and I had no food in the house.

I did however have the basics of food, and managed to muster up the ingredients to make a chocolate caramel slice, which is something I've never made before.

This recipe came from Epicure Chocolate, and what I like about it is that the caramel wasn't made on the stovetop, as it is in most caramel slice recipes. Instead you bake the base, then combine the caramel ingredients, pour them on top and bake in the oven until it goes all brown and gooey.

Thoughts - I had no copha, so I ended up using butter in the chocolate topping. This meant there was butter in all three layers, which made the overall flavour very buttery. Also due to the caramel being baked it went very hard around the edges, a bit like a Scottish Tablet. Which is not necessarily a bad thing. Overall I was happy with it, though next time I might ditch the butter/copha in the chocolate layer and just use straight up chocolate.

Saturday, February 27, 2010

Handbag bridal shower cake


I was attending a bridal shower this weekend for a very dear friend. She was my bridesmaid once upon a time, and she put so much effort into my bridal shower and hens night, so I wanted to make her something really special.


The theme for the day was "An Afternoon of Glamour", so my original plan was to make petit fours. I was going to bake three different cakes, each of which was going to be cut into nine squares and iced and decorated individually... seemed easy enough until the orange and almond cake fell apart when I took it out of the tin. So I decided to simply things, make just one cake, but make it glamorous somehow. Inspired by the Womens Weekly book of childrens birthdays cakes my first thought was a shoe, but since this was my first ever attempt at a novelty cake I opted for a handbag instead, which seemed simpler.


I used the Chocolate Birthday Cakes recipe from the Crabapple Cupcake Bakery book, but baked it in two square pans instead of cupcake papers. The first cake I just leveled and covered in a thin coat of chocolate buttercream, followed by pink fondant, which I found easier than I expected. The other I cut levelled, cut in half, sandwiched the halves together with chocolate buttercream, then shaped into a trapezoid that resembled a handbag.
Then came the tricky part - I made handles and a front medallion ahead of time from fondant I had dyed black. The first ones I made fell apart, and the replacements didn't have time to dry properly so one of the handles broke, but it didn't shatter like the first one so I could still make it look alright. I covered the bulk of the handbag in white fondant, the sides in pink, and the piping and "zipper" in black. I then gently pricked all the black parts to look like they had been stitched.
Look, for my first ever novelty cake it's not bad. Everyone at the shower loved how it looked and how it tasted. I am really proud of it, but I was frustrated, because I know it could have been better. I'm considering taking a cake decorating course to hone my skills a bit. At the very least I plan to make a few more fondant cakes, because I want to make one for Little Princess's birthday and I want it to be perfect :)

Tuesday, February 2, 2010

Layed chocolate mousse

In the interest of being a fair and impartial blogger, I think it's fair that I post the good and the bad - and the disasterous. This recipe falls into that third catergory.

The recipe looked simple enough, with the added bonus I could make it a day before having friends over. But since I only own one bowl for my mixmaster, I decided to do the white choc layer first, and the dark one much later. Thank goodness I did.

I managed to get the cream semi-whipped with no problems. Melting the chocolate was a tricky process (some found it's way on the floor) but that went fine. Whipping the eggs in a steel bowl over simmering water proved trickier than I expected, but still went ok.

When it came time to add the eggs to the chocolate that's when things went wrong. Adding the eggs caused the chocolate to seize. Enough stirring just managed to save it, but then I added it to the cream and the whole mixture curdled and went lumpy. I didn't even bother trying to let it set, I just chucked it out.

I'm not sure where I went wrong. I've since re-read the instructions, and I think I did everything right. I may attempt it again one day, for for now I'm just relieved I still have plenty of eggs, cream and dark chocolate left over because now I can attempt something else for my dinner tomorrow :)

Sunday, December 27, 2009

Pastitsio

Tonights dinner was yet another recipe from 100 Pasta Favourites - I really love this book. It's essentially a layered pasta bake. The bottom layer is macaroni, with a little egg and parmesan. The middle is a beef sauce, kind of like a bolognese but with a hint of cinnamon. And the top layer is a bechamel cheese sauce.

I didn't have any beef stock cubes, so I substituted chicken stock. And I only used one onion, instead of the two the recipe asked for. And I ended up adding a dash of flour to the meat sauce to thicken it, because it was just taking forever.

This recipe involved a lot of everything - a lot of ingredients, a lot of time, and a lot of dirty dishes. And the end result was a lot of food. Far more than hubby and I could finish. Now that Little Princess is three months and can sit in her bumbo and watch me cook for short stretches of time, it was a little bit easier to cook it because I wasn't as limited to her nap time. But it's certainly not a recipe for the average working mum.

Thoughts - it was ok, but not great. Very edible, it had good flavour and was filling. A bit too much bechamel, but otherwise alright. But I just felt it wasn't worth the two hours it took me to make it, nor was it worth the two hours it took me to clean up afterwards. I certainly won't be making it again.